What this post is about
- LVM
- Disk partitions (filesystem label/partition name,
mount, /etc/fstab, /etc/mtab) - Linux runlevels
LVM
LVM (Logical Volume Manager) can create “dynamically resizable partitions”. It solves your problems when you do not know how much memory you need to allocate for a disk partition.
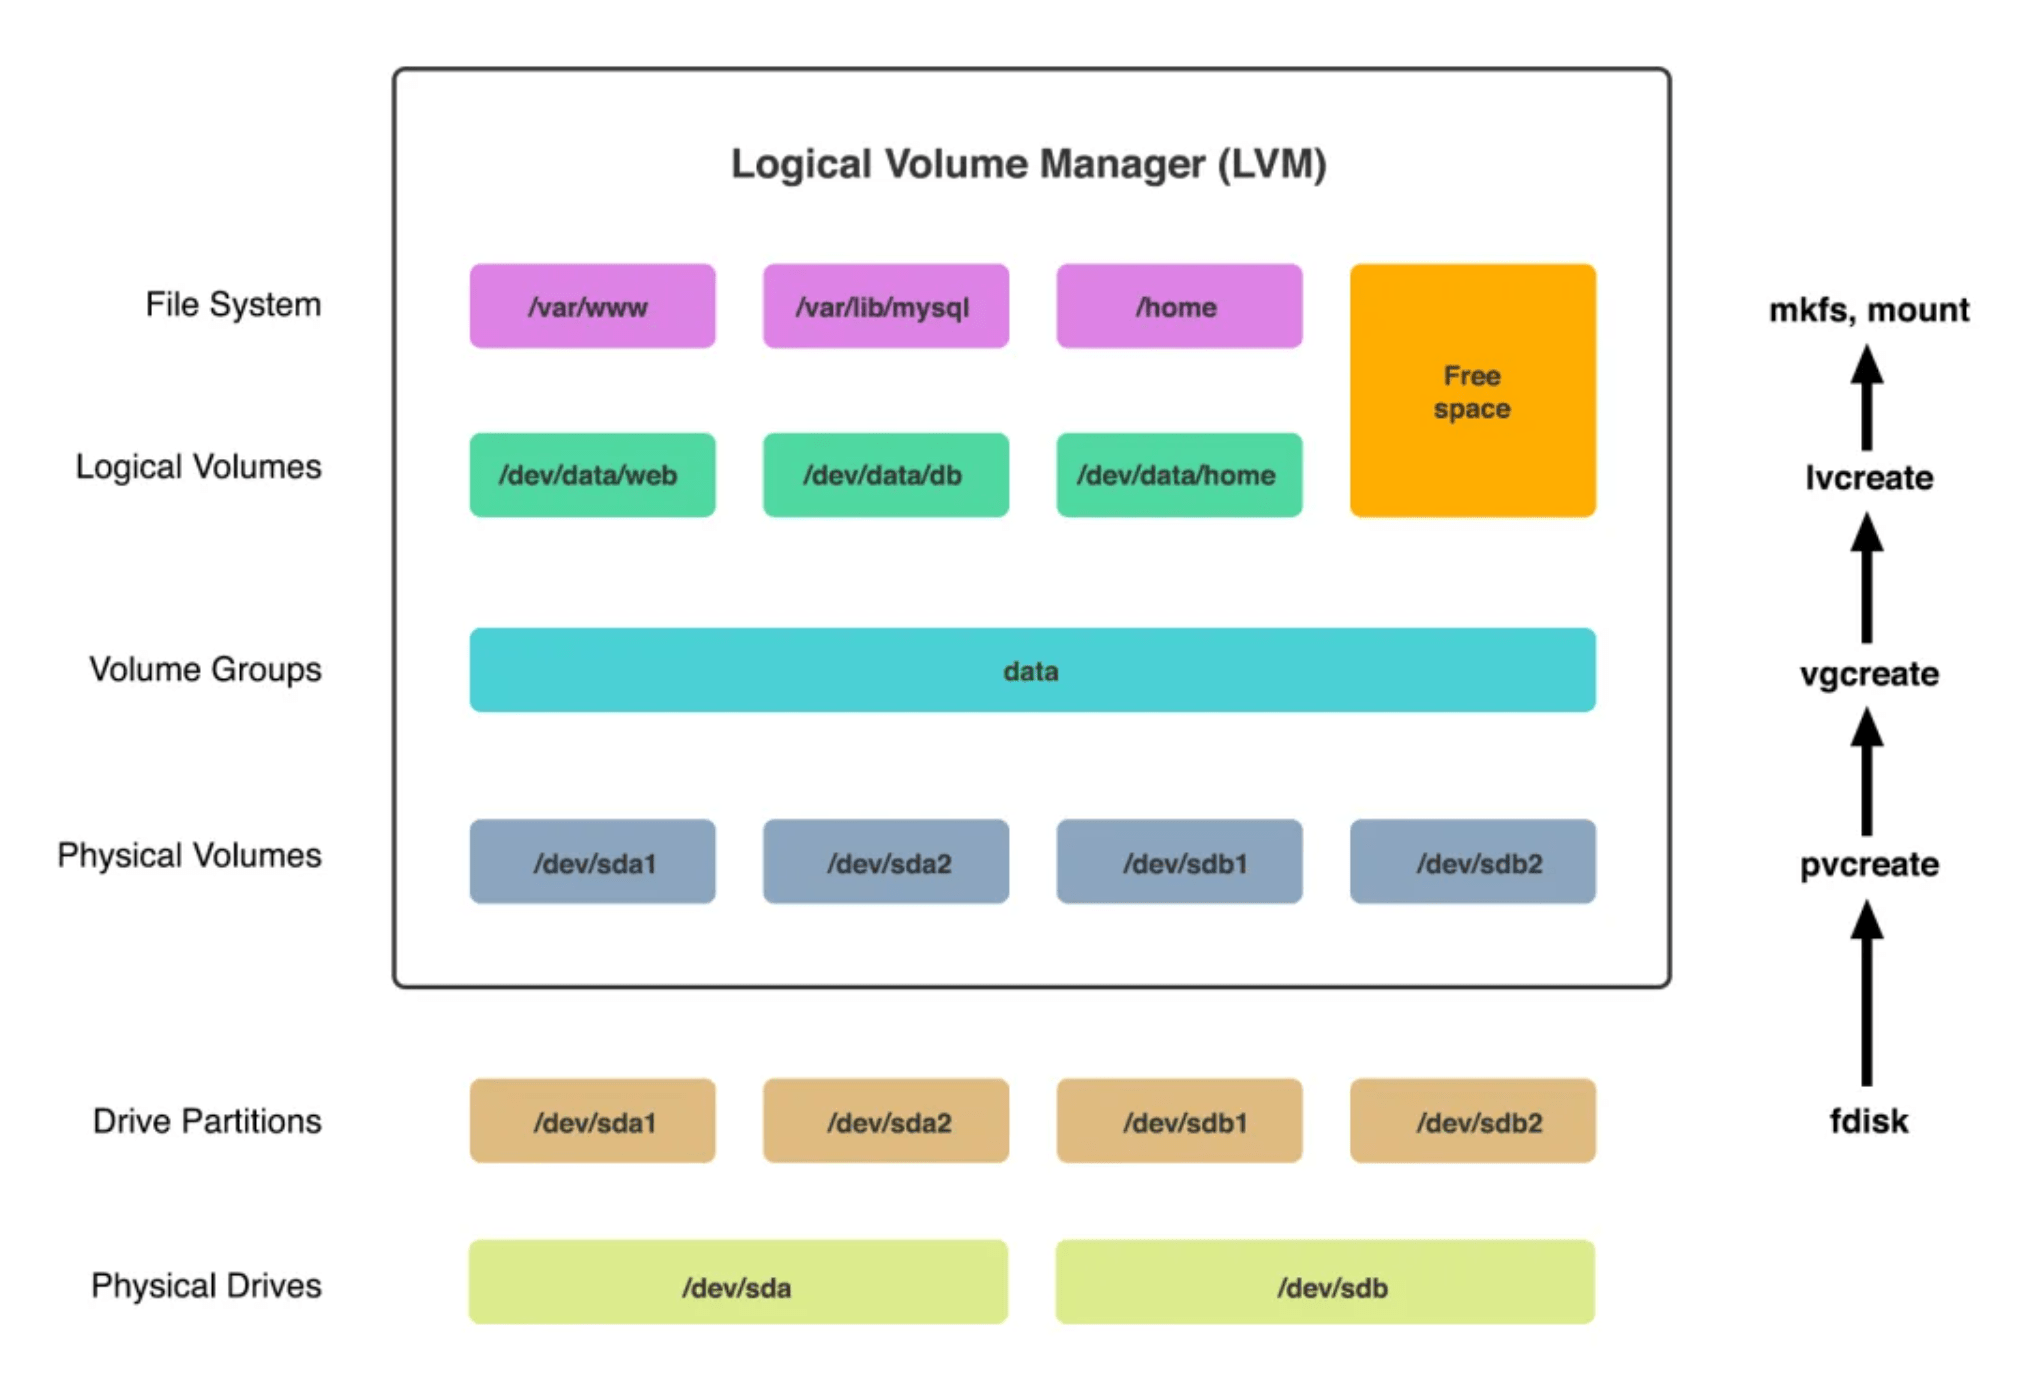
LVM has three logical levels to work with:
- Physical Volume(PV) - a physical device or a partition (/dev/sdb3, /dev/sda1, /dev/sdc etc.)
- Volume Group(VG) - a group of Physical Volumes (a pool of memory)
- Logical Volume(LV) - a “partition” of a Volume Group
LVM examples
Let’s work with LVM. At first, you need to install lvm2 packages.
sudo apt install lvm2
There are commands to work with logical levels in LVM:
pv* - Physical Volume commands
vg* - Volume Group commands
lv* - Logical Volume commands
Physical Volume
For example, to create a PV from /dev/sdb5 enter:
pvcreate /dev/sdb5
When you run
lsblk -f
you may notice that /dev/sdb5 filesystem type changed to LVM2_member
If you try to run pvcreate with a partition that has filesystem installed, you will be warned:
pvcreate /dev/sdb5
WARNING: ext4 signature detected on /dev/sdb5 at offset 1080. Wipe it? [y/n]: y
  Wiping ext4 signature on /dev/sdb5.
  Physical volume "/dev/sdb5" successfully created.
or
pvcreate /dev/sdb5
WARNING: ext4 signature detected on /dev/sdb5 at offset 1080. Wipe it? [y/n]: n
  Aborted wiping of ext4.
  1 existing signature left on the device.
If you want to mount a partition that is a PV you will get:
mount /dev/sdb5 temp
mount: /mnt/temp: unknown filesystem type 'LVM2_member'.
       dmesg(1) may have more information after failed mount system call.
If you want to check info about Physical Volumes, enter:
pvdisplay
or
pvs
Volume Group
When we want to create a VG named vg01 from /dev/sdb5 and /dev/sdb7, we enter:
vgcreate vg01 /dev/sdb5 /dev/sdb7
but if, for example, /dev/sdb7 or /dev/sdb5 are not PVs LVM makes them PVs automatically. You will be warned if one of your partition already has a filesystem installed.
If you want to check info about Volume Groups, enter:
vgdisplay
or
vgs
Logical Volume
If you want to create a LV with 2GB size named lv_home and allocate memory from VG named vg01, you enter:
lvcreate -L 2G -n lv_home vg01
When you create a LV, LVM creates a device file with the chosen name and put it in /dev/<Volume Group name>, so the path to our newly created Logical Volume will be /dev/vg01/lv_home. You also need to create a filesystem on LV. After it you can mount it as a normal disk partition.
If you want to resize a Logical Volume, check lvextend. This command doesn’t extend filesystems, so you need to do it manually by calling a corresponding command. For example, if my filesystem is ext4, I need to use resize2fs. But also there is a lvresize where you have -r option that resizes filesystem automatically.
Also you can choose from which place you need to get memory, for example, this command allocates new 1GB memory to lv_home LV from /dev/sdb7 PV.
lvextend -L +1G /dev/vg01/lv_home /dev/sdb7
  Size of logical volume vg01/lv_home changed from 2.00 GiB (512 extents) to 3.00 GiB (768 extents).
  Logical volume vg01/lv_home successfully resized.
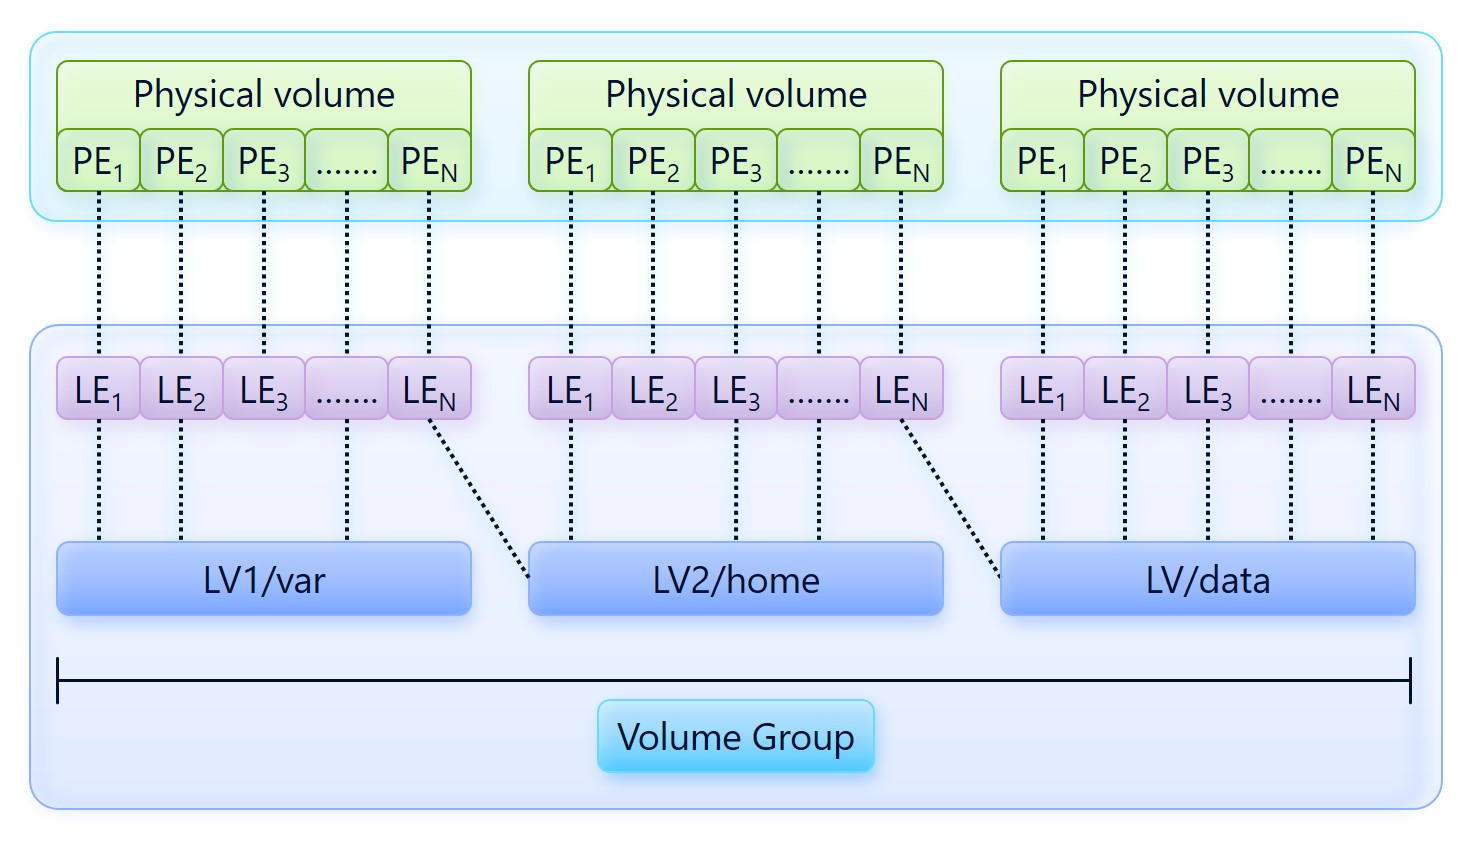
So we can see that memory can be scattered across different disk partitions!
A bit more
LVM works thanks to Device Mapper. Device Mapper allows to create virtual block devices on which LVM builds its logical structure. This abstracts the file system from the physical disks, making dynamic space management possible. LVM uses blocks named extents that are usually 4MB. You can look at the picture that explains how memory can be scattered across different disk partitions:
About partitions
When I was making disk partitions, I stuck into a problem: there was a name partition name and a filesystem label.
Actually there is partition name and filesystem label (people might say partition label or filesystem name). Old partition tables (MBR) supported only filesystem labels, while new partition tables (GPR) supports partition names and filesystem labels. Most programs use filesystem labels. You can set a filesystem label on a system that may not have partition names (MBR) and you can set a partition name on a system that may not have filesystem labels (GPT).
A bit about /etc/fstab and /etc/mtab
I found out that /etc/mtab is a file containing currently mounted filesystems. Also I found out that you can use
mount -a
to mount all the filesystems in the /etc/fstab.
In the /etc/fstab file it is better to use UUID in case of disk reconnection (/dev/sda will become /dev/sdb), and for logical volume it is better to specify the path, since information about lvm is stored in metadata.
Good practices
Partitions
If you want to make partitions to your system you may want to use LVM, so it is better to create different partition for /boot:
/boot   1GB    ext4
LVM:
  /     50GB   ext4
  /home remaining space
  swap  4GB    (or swap file)
and in 95% of cases you need to create one big disk partition and create all the Logical Volumes you need.
How to mount LV under /home
To mount a partition under /home, you need to mount this partition somewhere, for example /mnt/new_home and copy the entire folder there
cp -a /home/* /mnt/new_home
but before that you need to log in as root, because the files in /home can be used. To do this, you need to run the
telinit 3
which will restart the system in console mode, and log in as root. Read more about telinit below.
About runlevels
There are 7 runlevels in Linux (0-6). Different processes correspond to each runlevel. To change runlevel use telinit:
telinit [runlevel]
- Power off the machine.
- Single-user mode.
- Multiple-user mode without support for network services (daemons).
- Multiple-user mode with network support but without graphical interface.
- Is not used. This mode is configured by user.
- Like 3 runlevel but with graphical interface.
- Reboot the system
Usually 3 or 5 runlevels are used.
In old systems file /etc/inittab is used to set default runlevel. Example:
#
# /etc/inittab
#
# Copyright © 1996-2002 SuSE Linux AG, Nuernberg, Germany. All rights reserved.
#
# Author: Florian La Roche, 1996
# Please send feedback to http://www.suse.de/feedback
#
# This is the main configuration file of /sbin/init, which
# is executed by the kernel on startup. It describes what
# scripts are used for the different run-levels.
#
# All scripts for runlevel changes are in /etc/init.d/.
#
# This file may be modified by SuSEconfig unless CHECK_INITTAB
# in /etc/sysconfig/suseconfig is set to "no"
#
#
# runlevel 0 is System halt (Do not use this for initdefault!)
# runlevel 1 is Single user mode
# runlevel 2 is Local multiuser without remote network (e.g. NFS)
# runlevel 3 is Full multiuser with network
# runlevel 4 is Not used
# runlevel 5 is Full multiuser with network and xdm
# runlevel 6 is System reboot (Do not use this for initdefault!)
#
To check default runlevel on newer systems enter:
systemctl get-default
To check modes associated with runlevels enter:
ls -l /lib/systemd/system/runlevel*
lrwxrwxrwx 1 root root 15 Jul  2 17:04 /lib/systemd/system/runlevel0.target -> poweroff.target
lrwxrwxrwx 1 root root 13 Jul  2 17:04 /lib/systemd/system/runlevel1.target -> rescue.target
lrwxrwxrwx 1 root root 17 Jul  2 17:04 /lib/systemd/system/runlevel2.target -> multi-user.target
lrwxrwxrwx 1 root root 17 Jul  2 17:04 /lib/systemd/system/runlevel3.target -> multi-user.target
lrwxrwxrwx 1 root root 17 Jul  2 17:04 /lib/systemd/system/runlevel4.target -> multi-user.target
lrwxrwxrwx 1 root root 16 Jul  2 17:04 /lib/systemd/system/runlevel5.target -> graphical.target
lrwxrwxrwx 1 root root 13 Jul  2 17:04 /lib/systemd/system/runlevel6.target -> reboot.target
So to set default runlevel you need to change /etc/systemd/system/default.target link pointing to selected target.
Some useful commands
- vgchange - change volume group attributes
- lvchange - change logical volume attributes
- blkid - locate/print block device attributes